There are quite a few articles out there discussing Papervision3D and sharing source code, etc. but very few explain in plain English how to actually get started with PV3D. For those of us that aren’t geeky enough to guess our way into getting it to work we are usually left in a dust of confusion. Papervision3D, if you aren’t familiar with it, is a way to do 3D inside Flash - it’s extensive, cutting edge and very well laid out. More and more sites are popping up on the web utilizing this technology… so what are you waiting for?
It is up to you to decide which IDE you are going to use to do Papervision3D development. I will be explaining how to install it in both Flash and Flex, afterwards you’d be ready to start creating projects and learn from other examples.
Getting Started
The first thing you need to understand is that in both Flash and Flex there are 2 ways to access the source needed for your Papervision3D project. One way of doing this is getting the compiled source code that you’d use in Flash as an .mxp component or in Flex as a .swc library. The other method is using the non-compiled source code. I am going to suggest that you stick to using the non-compiled source code since the code is not encapsulated, you can easily go into your classes and modify them if needed. If you do not care about modifying the source code then you can stick to using the compiled versions. I will be explaining how to get the compiled versions for the application specific steps, if you’re planning on using that then skip the Subversion Control step (Flex needs Subversion in either case). If you’re going to use the non-compiled source in Flash or setting up in Flex then continue.
Download the source through SVN(Subversion Control)
You need to get the source from a SVN. To some Windows and Mac users this concept may sound confusing. It’s not like downloading a zip from a hyperlink or a specific file. It’s a well known concept in the open-source community so if you’ve used Linux before this is probably familiar to you.
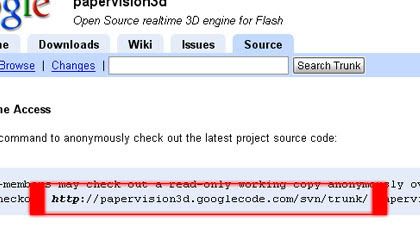
The official Papervision3D SVN is hosted at Google Code:
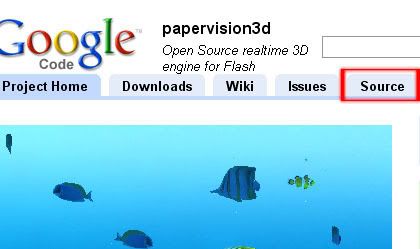
You can get the SVN URL for all the links by going to http://code.google.com/p/papervision3d/source/checkout but you can just type this in your SVN application (which I’ll explain below) to get the files you need.
http://papervision3d.googlecode.com/svn/trunk/branches/ GreatWhite/
Windows
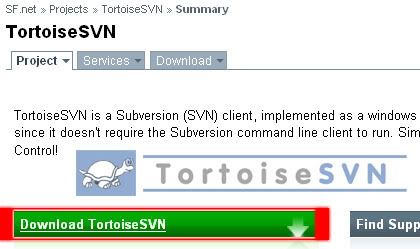
Many other Papervision3D users have recommended TortoiseSVN and I agree with them, It’s a great tool for SVN source downloading using Windows.
You can go to TortoisSVN’s site here: Click here
Download the latest version directly from sourceforge: Click here
 Proceed with the article once you’ve downloaded and installed you can the package.
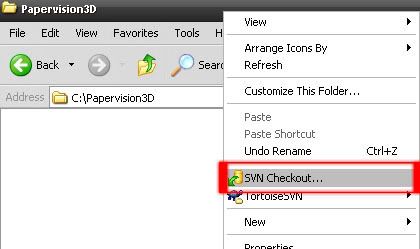
What you need to do now is create a folder, for example inside your work directory or root drive, called “Papervision3D” or “PV3DSource”. You’ll be using this folder to download the SVN. Once you’re inside you need to right click to open the folder properties menu; you’ll notice that there is 2 new options. Select “SVN Checkout” to proceed.
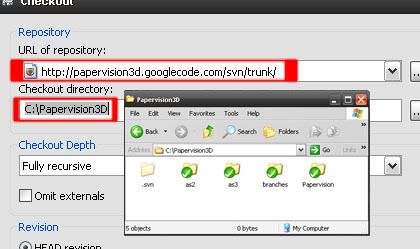
You’ll see a input box labeled: “URL of repository” - (This is all you need to be concerned about). Add the SVN URL and let it run, it might take a couple of minutes to complete depending on your connection.
Now you have the needed files to continue.
Mac
I’m not a Mac user but I did some investigation, this might or might not be useful, so if there is anyone that would like to contribute to this part of the article just leave a comment.
I found this SVN client called “svnX” and its opensource so it should get the job done. Here’s a quote from their site:
An open-source GUI for Subversion, the compelling replacement for CVS. It allows you to browse your working copies, spot changes, and operate on them, but also to browse logs and revisions of your repositories!
You can go to svnX’s site here: Click here
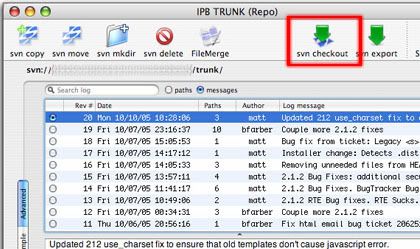
The first thing you need to do is click on “SVN Checkout” and set a directory for your Papervision source directory. Once you have done that you should be ago to the “Repositories” window and add the SVN URL.
Let the download run and once it’s finished and you see all the files you are ready to continue.
Installing on Flash
This will be split into 2 parts depending on which source you decided to settle on. If you decided on using the Flash Component then continue, if you prefer using the non-compiled source code skip the following step.
Using the .mxp Component
(NB: At the time of writing this the .mxp is Version 1.5 and not 2.0)
If you’re still not 100% whether you want to use the component, I might be able to put your mind to rest. There are some benefits to using the component and John Grden from Rock On Flash explains it very well here
# Design-time render and editing in Flash IDE
# 3 Material types supported - BitmapFileMaterial, BitmaAssetMaterial and MovieAssetMaterial
# Creates MovieScene3D and Free or Target camera
# Manages resizing / centering of Papervision3D scene [optional]
# Dynamic masking to constrain the viewable render area to the bounds of the component [optional]
# Full API and access to Scene, Camera, Collada objects to code around
# Automatically loads materials via Collada file [when materials list is not given]
# New Custom Panel for modifying rotation, camera zoom, camera focus, camera Z at design-time
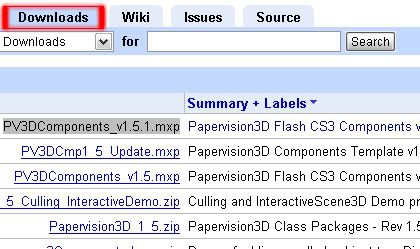
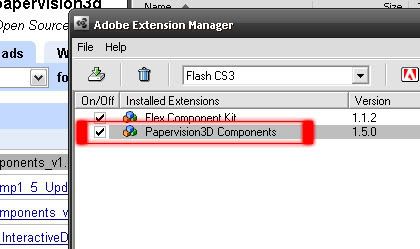
You can download the Flash components from Google Code under the downloads tab. Download the latest file, it should look something like this - PV3DComponents_v#####.mxp
Once you’ve downloaded the file you can run the .mxp as an executable. It will automatically open “Adobe Extension Manager” and ask you to accept an agreement and then it will install itself. If you have Flash already running you’ll have to restart to see the changes.
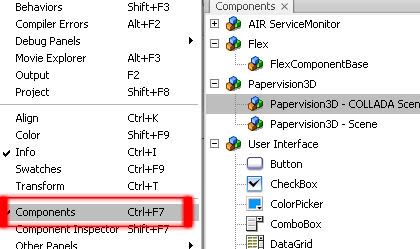
You can create a new document inside Flash (AS3 Document) to get started. I won’t be showing you how to create anything in this article as the purpose is to show you how to install. What I will do, however, is show you which menus you can access with the Papervision3D .mxp. First off, everything is listed under Window > Components, there you can either choose to create a Papervision 3D scene or Papervision 3D Collada scene.
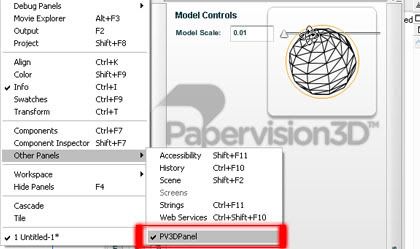
If you’re planning on using the Collada component you can access a very nice GUI menu which lets you set the location, camera, rotation, etc. You can access this by going to Window > Other Panels > PV3DPanel.
When you’ve installed the .mxp you already have complete access to the classes in Papervision3D so there is nothing else you need to worry in terms of set-up.
Using the non-compiled source code
If you’ve already installed the .mxp file you can skip this part. Getting the non-compiled source code running with Papervision is painless. You can decide whether you want to set up Papervision3D for any project you create or for individual projects. It is best practice to set up PV3D on each individual project so I’ll explain how to do this.
Create a new document inside Flash (AS3 Document) to get started. Click on “Publish: Settings” in your properties menu, if you don’t have a properties menu you can open it through Window > Properties. A publish settings window will open on the “Flash” tab; select “Actionscript” on the left hand side.
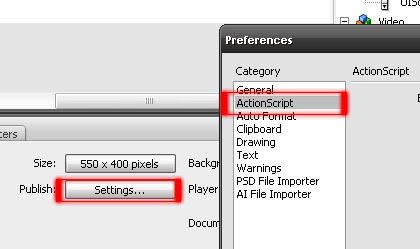
All you need to do now is click on the “+” symbol and specify the directory of your source. If you used the “svn/trunk/branches/ GreatWhite/src” URL in your SVN client then you can link to the folder you created to download the files, otherwise you need to navigate to the /src dir.
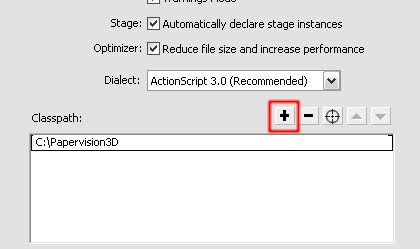
And that’s it! Your scene file will now work with the Papervision3D classes.
Installing on Flex
The implementation of Papervision3D in Flex is similar of that in Flash in terms of the fact that you can choose between compiled and non-compiled source. We’ll start with the compiled version, (.swc file)
Using the compiled .swc library
Lets get started - Create a new project by going to File > New > Flex Project
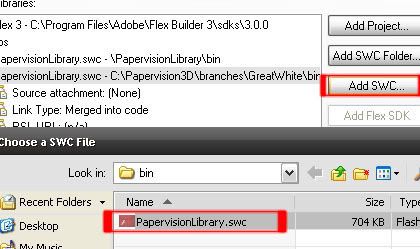
Specify a name for your project and a project location and leave the rest on default, click Next, specify a debug directory and click Next again. Select the “Library” tab and click the “Add SWC” button. Navigate to the directory you created for your Papervision3D source, go to your Greatwhite directory in branches and click on the bin folder, which contains the swc file you need. All that’s left to do now is click “Finish” and your project is Papervision3D ready.
Even though your project will run fine with the .swc file specified as a library it is best practice by creating a Flex library project which you can re-use. In describing how to set up the non-compiled source code with a Flex Library project below you can apply the same principle using a .swc file.
Using the non-compiled source code
The first thing we need to do is set up a Flex Library project so that we can re-use the same Papervision3D source for every project. This practice is better since you can update, modify and manage the source code all from one location.
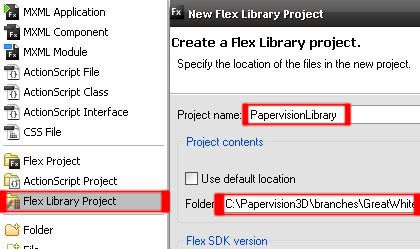
Create a new Library Project by going to File > New > Flex Library Project
Specify a name, something like “Papervision Library” would do, you need something that is descriptive so you can refer back in future projects. The project folder should navigate to the Greatwhite directory under branches in your source folder. Click Next.
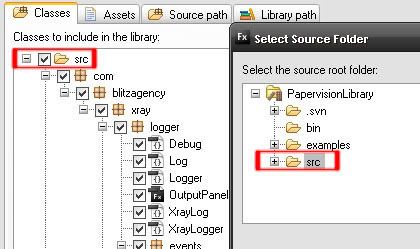
If you specified the folder correctly you will notice that you have classes listed in your classes tab. Select “src” and you will notice it populating. After you have done this you have to browse to the main source folder and select “src”. Click Fnish and your Papervision3D Flex library project is ready to go!
Now that you have your Flex Library Project ready we need to have a project utilize this library.
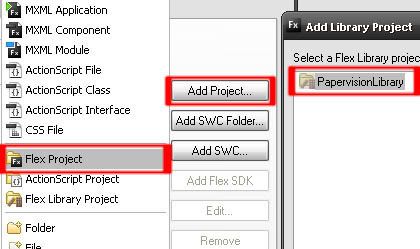
Create a new Project by going to File > New > Flex Project.
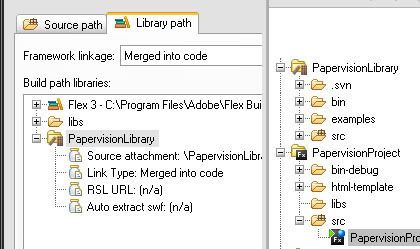
Specify a name for your project and a project location and leave the rest on default, click Next, specify a debug directory and click Next again. Under the Library path tab click on “Add Project” and you will see that your newly created Flex Library Project for Papervision is listed, select your library project. Click Finish and you’re ready to go!
Your Flex Project should now communicate with your Flex Library project, review the image below and see whether your project structure looks similar.
Conclusion
When I started this guide I was not aware that there would be so many ways to set up a Papervision3D project, hopefully this is as informative to you as it has been for me. I have done a lot of research on Google and I keep finding what I just explained to you described in 3-4 short sentences, maybe I’m the only one that found this complicated in the beginning. I would love to hear back from you to know whether this article has proved useful.


